B’s Summer Salad

It’s summer in London.  No way! Yeah,  I have this conversation daily in my head when I’m dressed in a long sleeve shirt topped with a light jacket.  But seriously, today the sun’s out!  😉  I deserve to whip up a summer salad in celebration. It’s a mix of italian and greek salad.  Basically combined my favourite parts from both.  So here it is!

Image

I used this on the top (Marinated Feta Cubes):

Image

B’s Summer Salad

Makes: 1 big bowl 

Ingredients for the dressing:

  • 3 tbsp olive oil
  • 2 tbsp vinegar
  • 1 tbsp lemon juice (might add more next time)
  • 1 tbsp dried basil
  • Salt, Pepper, Chilli flakes and Oregano – to taste

Ingredients for the Salad:

  • Romaine Lettuce, Cherry Tomatoes (halved), 1 Avocado, Marinated Feta Cheese cubes, olives and anything else you have in your fridge that you like 🙂

Method: 

  • Mix dressing together in a bowl.  Chill overnight.  I always believe dressings are best the next day as the flavours are enhanced!
  • Serve over cut salad 🙂

B’s Nutella Croissant Bread Pudding

Image

YUMMY.  This recipe came about one day when we didn’t have bread in the pantry but had croissants. We wanted bread pudding but didn’t have bread.  That just sounds ridiculous to not have the core ingredient!  Then I thought to myself – croissants would be a far better substitute.  The texture of croissants allow greater absorption of the creamy mixture and biting into that – would well be somewhat divine.  Bread pudding is already such a treat, can you imagine it with buttery croissants?  My husband LOVES NUTELLA.  He eats it from the jar.  That got me thinking…  Buttery croissant pudding with.. Nutella?  Better still, imagine it with oozing nutella. YUMMY.  So I set it out to make it right!

I’ve made this 2-3 times as its still a pretty new invention.  We had a poker night this weekend, so thought it was ideal for it.  🙂

Here’s the recipe for you to try out!

B’s Nutella Croissant Bread Pudding

Makes: 1 tray/pyrex

Ingredients:

  • 4 butter croissants
  • Nutella (as much as you desire!)
  • 700ml – 1 litre milk (depends how thick you want it)
  • 1 cup double cream
  • 1/3 cup sugar
  • 4 1/2 tbsp custard powder
  • Vanilla essence to taste

Method:

  1. Cut the croissants in half and put Nutella in the middle as a stuffing.
  2. Lay the Nutella prepared croissants in a dish.
  3. Beat together the milk, double cream, custard powder together.  Add the sugar and vanilla essence.
  4. Bake at 180 degrees for about an hour.

Enjoy this easy dessert with simple pantry ingredients!  xx

Foodie Fridays: Fruit Jelly

My aunt brought me packets of Agar Agar from Singapore, so i decided to use some up!  I googled a few fruit jelly recipes with agar agar as an ingredient so it’ll be vegetarian.  I quite liked this youtube video where this guy mixed agar agar fruit with a cake layer.

I had just made Nutella Cake 2-3 days ago and had some left overs which I could use in the jelly – so this recipe became an instant winner.  A picture of the final product!Image

I put the jelly in small moulds as it made nicer individual treats.  Although next time I want to try it in a cake mould.  A jelly cake with real cake!

B’s Jelly Agar Agar with Strawberries

Makes: 4 small moulds

Ingredients:

  • 2 tsp agar agar powder
  • 3-4 tbsp sugar (you can just omit it if you want)
  • Handful of cut strawberries
  • Some leftover cake cut into cubes

Method:

  1. Arrange strawberries in the mould facing downwards.
  2. Boil half the water and add 1 tsp agar agar and 2 tbsp sugar.  After the powder is dissolved, pour into the mould.  Freeze for 10 mins.
  3. Remove from freezer and pierce the top jelly a bit with a fork.  Add the cubes of cake on top of this layer.
  4. Repeat step 2 for another jelly layer.  Add it.  Freeze for 10 mins.  Refrigerate till you want to eat it.  Remove it from the mould and serve it inverted!

Easy and a great summer delight.  This would make a healthy snack if you omit the sugar out completely.

xx

B’s Recipe Index

The list of my tried and tested recipes that I’ve blogged about so far!

Appetizers

Avocado (Mustard-Mayonnaise) Crusted Chips

B’s Butternut Squash and Sweet Potato Mash

B’s Basil Pesto Bruschetta

Bread Cups with Fresh Guacamole

B’s Crunchy Chickpea Bites

B’s Crispy Kale

Easy Stove Top Homemade Salty Popcorn

B’s Grilled Potatoes

Quorn Steak Sushi

B’s Mediterranean Lettuce Cups

Makhani Potato Bake

Baking

Coconut Scones

Eggless Scones

Extremely Easy Banana-Nutella Boats

B’s Eggless Scones (Revised Recipe)

Cookies

B’s 2 Ingredient Granola-Banana Cookies

Chewy Brownie Cookies

Sugar Cookies

Breads

Cheese Loaf

Easy Home-made Artisan Bread

Olive & Cheese Breadsticks

Desserts

B’s Eggless Oven Pancake 

B’s Eggless Milo Custard

B’s Frozen Banana Ice Cream

B’s Easy 3 Ingredient Ice-cream:  Banana, Nutella & Peanut Butter

B’s Nutella Croissant Bread Pudding

Fruit Jelly

Sago Custard

Mains

Asparagus, Tomato & Olive Pasta

Chinese Crispy Noodles

Chinese Style Ginger Glazed Brussel Sprouts

B’s Easy Vegetarian Chow Mein (Chinese Noodles)

B’s Easy Jacket Potatoes

B’s Red Sauce Topped Over Spinach & Ricotta Tortellini (Easy)

Eggless Oven Pancake with a Mexican Quorn Minced Twist

Easy Sushi Bowl

Kitsune Udon (Japanese Noodle Soup)

Makhani Paneer

Mushroom Feta Spaghetti

Scrambled Tofu

Eggless Tofu Frittata

Pad Thai

Peanut, Almond & Walnut Satay Sauce Noodles

Pineapple Fried Rice

Poha – Flattened Rice

Vegan Jacket Potatoes (With Creamy Avocado & Sweet Corn)

Vegan Savoury Masala Pancakes (Chilla)

Vegetarian Tuna Jacket Potato with Avocado and Chia Seeds

Salads

B’s Easy Coleslaw Salad

B’s Multi-seeded Cranberry Salad

B’s Summer Salad

Spreads

B’s Basil Pesto Spread

B’s Easy Home-made Peanut Butter

B’s Oregano Cashew Dip

B’s Quick and Healthy Hummus

Guacamole (Avocado Spread)

Drinks

B’s Easy Green Smoothie

Ferrero Rocher Banana Smoothie

Fresh Raspberry Lemonade

Foodie Fridays: Sago Custard

I’m going for a BBQ at a cousins’ house later in the evening – so thought I’d take something along, just because I’m quite nice that way 😉  Wanted to make something easy (ok so I’m not THAT nice 😉 but nice enough!) What was imperative was that I didn’t have to go hunting for ingredients.  I hate that.  My criteria for being nice was: something basic but tasty.  So I looked through my recipes and came across sago custard.  Sago Custard is a family recipe, my aunt’s to be precise.   I haven’t made it since I lived in Australia.  So really has been ages.

For those of you who have never made sago.  Don’t fear as B is here!  🙂  I’ll guide you step by step.

Firstly, you need sago (made from tapioca FYI) seeds!  If you need to go buy these little tapioca seeds, they look like this:

Image

Secondly: Boil water and add 1/4 cup sago seeds after water is boiling.  Leave it to simmer for 10 minutes.  Keep stirring so the starch content does not stick.

Image

It should like the above after 5-7 minutes.  Where you can still see white dots.  Keep simmering.  The aim is to make it translucent.  After 10 minutes, switch the heat off and cover with a lid for another 10 minutes.  It will then become completely translucent.

Thirdly:  Sieve it with running cold water to remove excess starch.  Keep aside.  The sago is ready to be added to the simple dessert.

Aunt’s SAGO CUSTARD

Makes: One bowl

Ingredients:

  • 2 cups of milk
  • 1/4 cup evaporated milk
  • 3-4 tbsp custard powder
  • 1/4 cup sago
  • 1/3 cup sugar
  • vanilla essence

Method:

  1. Boil milk and sugar.  Add evaporated milk.
  2. Dissolve custard in water.  Add mixture to milk.
  3. Add in pre-boiled and washed sago.
  4. Refrigerate to set.

**It is nice hot as well.  A good dessert for Winter!  I decorated it with strawberries – just cause its prettier that way!

Here’s the final product!  Hope everyone enjoys it at the BBQ 🙂

Image

xx

B

B’s Makhani Paneer

I love indian food in restaurants.  Home indian food usually doesn’t appeal to me much as it doesn’t have that richness.  Subsequently, at home I prefer cooking healthy stir fries (Chinese/Thai/Japanese) or simple indian lentil soup (daal).  I don’t usually try rich creamy food at home. I guess the butter content screams FAT and echoes in my kitchen.  The voices in my head do not allow this.  🙂

However, last week I really wanted Makhani Panner (Butter Tomato Sauce with Cottage Cheese cubes).  This is often accompanied with Naan Bread in restaurants.  We always order this when we are out.  Somehow the calories don’t count when eat out.  The delusional side of me believes that 😉  Since it was a meal at home,  I made wheat chapattis – healthy alternative since the butter content was already alarming.

The butter was worth it.  It was creamy – yummy and easy to make.  My husband swore it tasted like the one in the restaurant.  I had searched for a few recipes online and kind of made it to my own liking.  It was delish!!!! The creamy texture was perfect.

First – you got to mix all the ingredients together.  Always remember – if B can make it, so can you. 🙂  My mom always felt I was too busy with friends and university to ever enter the kitchen.  And now,  I’m trying different dishes all the time! Also – don’t get too alarmed by the list of ingredients.  Most of it consist of indian spices which is pretty basic for indian cooking, and once you have it at home, you can cook anything. 🙂

Image

After all the cooking, you end up with mouth watering Makhani Paneer!

Image

I loved the color!  Yum.  Here’s the recipe 🙂  Happy Cooking!

B’s Makhani Paneer

Makes: Enough for 2-3 people

Ingredients:

  • 1/2 big onion – chopped up
  • 1 big tomato – chopped up
  • 1/3 cup cashewnuts
  • 2 whole dry kashmiri red chillies
  • 2 – 3 tbsp butter (oh my!)
  • 2 pieces of: cinnamon stick, cloves, cardamons
  • 1 bayleaf
  • 4 tbsp tomato puree, 1 tsp concentrated tomato puree
  • 1 tsp garam masala
  • 2 tbsp yoghurt
  • 1/2 tsp sugar
  • 1 cup paneer (indian cottage cheese cubes)

Method:

  1. Boil chopped tomatoes, onions, cashew nuts  chillies with 1 1/2 cup water for 10-15 minutes.  Stir constantly.
  2. Cool and blend it with a bit of concentrated tomato puree.  (just like my first picture on top!)
  3. Heat the butter – and dd the spices (cinnamon, cloves, cardamoms) with the bay leaf.
  4. Add the tomato puree, garam masala and the red gravy and saute for a few minutes. Add salt.  Mix for another 2 minutes.
  5. Add yoghurt and continue mixing to avoid any form of curdling.
  6. Add the sugar.
  7. Add some water (1/2 cup) – depending on the desired thickness.  Add the paneer to mixture.
  8. TA-DA!  Serve with hot naan or chapattis.

Note:  Many people add cream to this mixture (a few tablespoons).  However,  for me the butter was more than enough.  And it tasted just fine!  🙂

Foodie Fridays: B’s Mediterranean Lettuce Cups

Hope everyones doing well.  It’s Friday so I’m sure the weekend makes everyone smile. 🙂

Foodie Fridays have been pretty fatty, should be called Fatty Fridays honestly.  Today was pretty healthy – I have to admit.  Well so far at least!  I had leftover hummus (the link will direct you to my recipe) from yesterday and thought I’d eat it differently.  Had Baby Gem Lettuce in the fridge which made me think of lettuce cups!  Baby Gem Lettuce are the best for lettuce cups as the shape holds very well as opposed to other types of lettuce – just FYI. I strongly recommend it!

hummus cups

Don’t they just look absolutely yummy?  They were better than good enough to eat, as far as the aphorism goes.  Very refreshing for a hot day in London (rare to have hot days here!).  Surprisingly, even my husband loved it for lunch.  For him it was more of a snack to be honest!

B’s Mediterranean Lettuce Cups

Makes: As many as your leftover hummus can fill!

Ingredients:

  • Hummus (home-made) or store bought
  • Baby Gem Lettuce
  • Olives

Method:

  1. Wash lettuce with cold water and assemble in a plate.  Leave it in the fridge for 10 mins if you want it nice and chilled.
  2. Spread hummus on it.  Top it off with olives!
  3. Voila! Eat and enjoy 🙂

So simple.  Yet so delicious and pretty!

xx

B

B’s Quick & Healthy Hummus Recipe

Hello everyone!  I’ve restarted my gym regime which means just one thing: time to zip my mouth to everything tempting.  Hmmm… Or so you would think.  I’ve decided to try out healthy dips and snacks that are still tempting minus the high calorie count.  Today I tried out my very own hummus recipe.  Basically most recipes online for hummus incorporate a high level of olive oil.  Fair enough, in the restaurants it is served that way – but if I eat my carrot sticks in an oil based dip, what good is it really?

Mixing everything up to form a smooth creamy paste:

Image

And the final product:

Image

Here’s my recipe:

B’s Quick & Healthy Hummus Recipe

Makes: One bowl

Ingredients:

  • 1 can chickpeas
  • 1 tbsp olive oil
  • Pinch of chilli flakes/paprika
  • 1 tsp cumin powder
  • 3-4 tbsp water
  • 1 tbsp lemon juice
  • Salt and Pepper to taste

Method:

  1. Spoon chickpeas from the can instead of draining.  The liquid adds flavour!
  2. Add all ingredients and blend away 🙂

Note:  Adjust the consistency to your preference by adding more or less water.  Best served chilled – I refrigerated it for 15 mins. I couldn’t wait any longer! 🙂

Enjoy!!

xx

B

Poha! – Flattened Rice

Poha – an unusual name that reminds me of Po  (The Teletubbies). Eh-oh! Oh God, I feel as though I have come from a completely different era, at the thought of the song.  Yes, it is playing in my head right now.  What a drag.

Anyways,  today I tried a new dish and wanted to blog about it 🙂  I made Poha, a south-indian lunchtime dish made from flattened rice.

It’s easily available in Asian Supermarkets in the Indian section.  My sister mentioned this dish to me after her trip to South India (Kerela) and said it was very easy to make.  In addition, it’s nutritious which led me to giving it a go.  The recipe below is a rough guide as I made it up as I went along (kind of like how indian fried rice is made).  Feel free to adjust the flavours and quantities as you like.

B’s Simple Poha

Makes: Enough for 4 people

Ingredients:

  • 1 medium sized flakes Poha packet (300g or so)
  • 1 onion
  • 2 tomatoes
  • 1 green chilli
  • 1 cup of okra
  • 1 big potato
  • 1 heaped tsp Ghee/butter/oil
  • Indian Spices: Cumin seeds, Curry powder, Red Chilli Powder, Cumin Powder, Garam Masala Powder, Turmeric Powder
  • Peanuts

Method:

  1. Preparation: Put Okra in the oven for 20 mins.  And par-boil the potato.
  2. Heat ghee in pan then add 1 tsp of cumin seeds for 1 minute. Then add chopped onions.  Saute on low fire for about 8 mins until onions are cooked.
  3. Add chopped tomatoes to the onions and saute.  Add a bit of water to cook the tomatoes.  Add 1 chopped green chilli to the mixture.
  4. Cook for about 5 minutes till a mixture forms (Steps 1-3 are the same for any indian cuisine FYI).
  5. Now add all the indian spices to taste.  Stir it, allowing mixture to absorb all the flavours.
  6. Cut both the okra and potato in bite-size pieces.  Add this to the mixture.
  7. Lastly, rinse the poha and drain it slightly.  Add to the pan and mix.  If it is a bit dry and some water while mixing as it tends to absorb water like rice.  Adjust flavours according to taste.
  8. Serve hot with peanuts on top for the extra crunch.

Note:  We had this with a side portion of cucumbers and yoghurt.  Also, I made daal (indian lentil soup) to supplement the meal.

Here’s a picture of my POHA! (Yes, I’m very much entertained by the name.  As I typed it in caps it reminded me of my ALOHA! post. 🙂  hahaha POHA!)

Image

Cheers to Poha! Let me know if you try it out.

xx

B

Foodie Fridays: B’s Quorn Teriyaki Steak Sushi

I absolutely LOVE sushi.  I guess being brought up in Japan does have something to do with that.  Japanese food is definitely an acquired taste.  However, in recent years the growing exposure to different cuisines has played a huge role in people experimenting with different flavours.  Japanese food is now everywhere.  Being vegetarian, the variety of sushi is limited in restaurants. 😦  Anyways, when you have a creative mind and hands that are willing to get dirty (dirty with food is always ok, not with mud. There’s a difference! I’m not an outdoor-hiking-kind fyi) then there’s no limit!

Having a love for aesthetics, the food I eat has to look as good as it tastes.  The taste is always takes precedence though, I will never compromise on taste.  Saying that, I would compromise on it just if it is very unhealthy and I’ve just come back from cardio. The cliche aphorism works well for me – health is wealth.

Ok, so you got the point.  The fact that the sushi looks impeccable and it is healthy makes it a winner.  Here’s a picture of the sushi I made:

Image

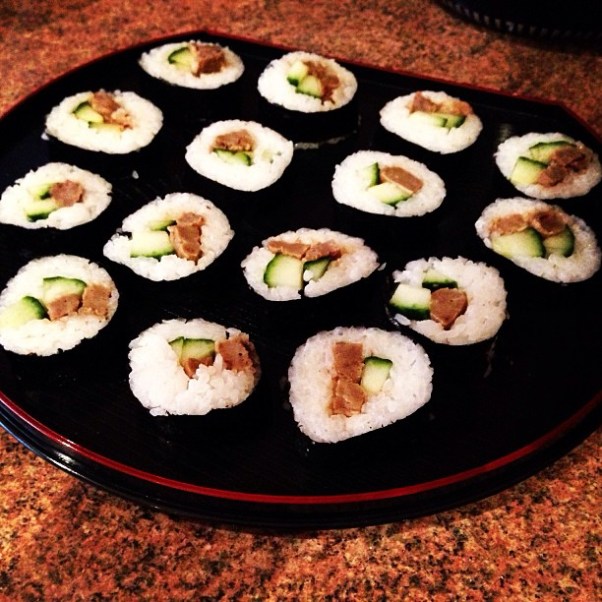
Please stare at it in awe as I did.  My husband thought it was very professional!  And I got tons of likes on Facebook and Instagram which boosted my ego.  Small things make me happy.  Happiness then leads to big things 🙂  So try being happy with small things in life, don’t just wait for the big things as they might not come and you’ll end up being a grumpy-old lady by then! I’ve met many, and boy are they unpleasant.

Back to Sushi –  just went slightly off tangent there.

B’s Quorn Teriyaki Steak Sushi Recipe

Makes: 3 rolls of Sushi (about 24 sushis – depending on the size) 

Ingredients:

  • 1 1/2 cups Japanese Rice
  • 6 Tbsp Sushi Rice Seasoning
  • Teriyaki Sauce
  • 1 Cucumber, cut in strips
  • Quorn Steak Strips (half the packet)
  • 3 Nori Sheets

Method:

  1. Cook rice in a rice cooker.  Japanese rice takes less water than normal rice, so be sure to check the instructions. The ratio of the rice I use is 1 cup rice to 1 1/3 cup water. Let the rice cool down, don’t refrigerate it.
  2. In the meantime, pour a bit of teriyaki sauce in a pan and cook steak strips.  Add water as needed, but make sure the end result is sticky steak and not watery.
  3. Add seasoning to the rice.  If you like it more on the sour side, add more.
  4. Oil Sushezi a bit before putting the rice inside, and follow instructions.  See the video- that’s what I did as this was my first attempt!
  5. Put cucumber on one side of your rice mixture, and the Quorn Strips on the other.
  6. Place glossy side of Nori downwards, and you’re ready to roll.
  7. Use water as a glue for the end of the Nori.  Refrigerate the roll for a while, then cut the sushi.  And put the cut pieces back in the fridge.  Sushi is best served cold with Japanese ginger and Wasabi.

Note:  Hands might get sticky with rice.  Keep bowl of water nearby and dip your hands in often to remove stickiness.To remove stickiness of knife when cutting sushi,  I like dipping knife in water after each cut.  Keeps the sushi clean and pretty!

Enjoy! Itadakimasu (いただきます)!  Have I mentioned I speak/read/write Japanese?  Ok so I do.  Not as well as before though, as I don’t have much practice anymore!

The phrase above translates to Bon Appetite 🙂