B’s Vegetarian Chinese Crispy Noodles

Hello all!  Today we felt like having noodles – okay when I say we I actually mean more my husband than me.  I rather make something that would be appreciated to be eaten.  The chef needs to be appreciated.  When the eater goes hmmmm – it makes the chef feel good about the hard work that went into it 🙂  Ok – I have absolutely no idea why I’m calling myself a chef and speaking in third person today! I’m going to stop. LOL 🙂

Chinese Crispy noodles involve deep-frying and I didn’t feel like something so unhealthy so I made the exact gravy and had it with boiled noodles.  However – for those of you who want to try it crispy – you can deep fry it or acti-fry it (less oil and same result).

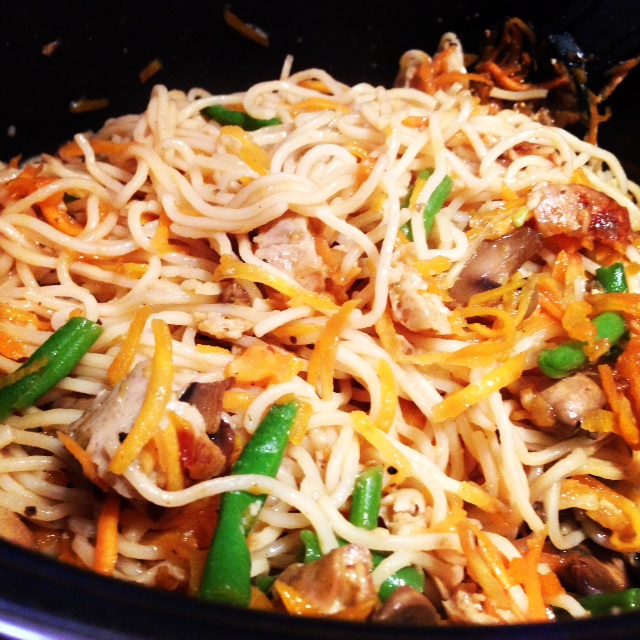
I loved the way it looked.

ImageDoesn’t it just look delish with the veggie chicken topped on it?  It gave it a really new chewy texture!

B’s Vegetarian Chinese Crispy Noodles

Makes: Enough for 3-4

Ingredients:

  • 1 tsp minced ginger
  • 1 tbsp sesame oil
  • Broccoli
  • Carrots
  • 1 can of Water chestnut
  • Baby corn
  • Chinese dried mushrooms (soaked in hot water for 10 minutes – cut the stalks off)
  • 1 cup of vegetable stock (I used OXO cube)
  • 2 Chicken fillets (You can use Quorn steak strips too!)
  • Sauces/Seasoning: 2 tbsp-Soya Sauce, 1 tbsp-Dark Soya Sauce, 1 tsp-Sweet Sauce, 1 tsp-Chilli Powder, 2-3tbsp-Mushroom water, Cornstarch (1 heaped tablespoon mixed with water)

Method:

  1. Saute ginger then add carrots and brocolli in sesame oil.
  2. Oven bake chicken and cut into strips. (Yummy!) 🙂
  3. In a separate pan, boil thin egg noodles. Drain the noodles once done.  (To fry the noodles- deep fry the cooked noodles)
  4. Mix sauces/seasoning in a bowl with vegetable stock.
  5. When vegetables are cooked and sauces to it and bring to a boil.  Add water-chestnut and mushrooms.
  6. Lastly, add cornstarch mixture and let it thicken to desired consistency.

Makes a one-pot vegetarian meal.  Easy to make and healthy 🙂

Enjoy!

x

B

Advertisement

B’s Eggless Oven Pancakes with a Mexican Quorn Minced Twist

ImageDoesn’t the picture speak for itself?  😉  So I have left-over El Paso Fajita Sauce (about half a bottle).  Was thinking of using it for lunch but didn’t have tortillas at home!  So I came up with this idea 🙂  It actually worked really well.  I used my Eggless Oven Pancake Recipe and topped it up with minced cooked in fajita sauce and cheese.  A vegetarian easy mexican meal!

Got my ingredients ready:

Image

And started baking the pancake base first.  This took longer than my recipe as I doubled it.

Image


Till its golden, and the tooth-pick comes out clean.  You’re ready to go!  Start topping it up!

B’s Eggless Oven Pancake Topped with a Mexican Quorn Minced Twist

Bakes: One pancake for 2 people

Ingredients:

  • 1 cup all purpose flour
  • 1 cup milk + 1 tbsp vinegar (for the buttermilk)
  • 1/2 tsp salt
  • A bit of butter to butter the tray 
  • Quorn Minced (1/3 packet)
  • Fajita Sauce (1/2 bottle) + 1 tsp Tomato Puree

Method:

  1. Preheat oven to 210 C.
  2. Pour a bit less than 1 cup of milk in a measuring cup.  Add 1 tbsp of vinegar to it and let it sit for 5 minutes.  This becomes your buttermilk.
  3. Pout milk in a bowl and mix in the flour and salt with a whisk.  
  4. Don’t overmix as it will lose its fluffiness as a pancake. (Just FYI)
  5. Pour in a greased pyrex dish.
  6. Bake for about 40-45 minutes till it’s golden (you can put a foil over it after 30 mins).
  7. Cook mince in the fajita sauce, a bit of water and 1 tsp of tomato puree.  Let it simmer till mince is cooked.  Stir occasionally,
  8. Top the pancake with the mixture and cheese and grill in oven till the cheese is melted.

Note:  Serve with a salad to balance this meal 🙂

Hope you enjoy it!

xx 

B


B’s Easy Vegetarian Chow Mein (Chinese Noodles)

Hello everyone.  Hope everyones been very good 🙂 Here’s another one of B’s Recipes 🙂  I am really enjoying this platform for me to blog and share.  Comments and likes are really encouraging, so please do keep them coming! 🙂

Thought I’d share an easy Chinese recipe that I’ve made up quite a while ago.  We have this usually about once a month with variation of veggies (depending what’s in my pantry!)

Hubby’s Chow Mein (it just looked more colourful than mine.  I DO NOT EAT CHILLI. I am Japanese at heart. Mild food = good food):

ImageDoesn’t that just look great?

Here’s a pic of all the veggies while cooking:

Image

And a pic of my noodles, slightly less colourful in comparison but more delectable:

Image

B’s Easy Vegetarian Chow Mein (Chinese Noodles)

Makes: Enough for 3-4 people depending on appetite! haha!

Ingredients:

  • 1 packet Chow Mein Noodles
  • 4 carrots
  • 6 mushrooms
  • Handful of green beans
  • 3 Quorn Sausages
  • Seasoning: Light Soya Sauce, Dark Soya Sauce, 1/2 tsp red chilli powder, Sesame oil, mushroom seasoning

Method:

  1. Prepare noodles and drain.
  2. Put sausages in oven as instructions show and chop in bite size pieces.
  3. In a wok, put 1 tsp normal oil and 1 tbsp sesame oil.  When hot stir fry cut mushrooms till done.  Add grated carrots and cut green beans.  Add sausage pieces. Add seasoning to taste.
  4. Add noodles and adjust flavour.

It’s easy, healthy, vegetarian and yummy.  You really need to try this!

xx

B

Foodie Fridays: B’s Quorn Teriyaki Steak Sushi

I absolutely LOVE sushi.  I guess being brought up in Japan does have something to do with that.  Japanese food is definitely an acquired taste.  However, in recent years the growing exposure to different cuisines has played a huge role in people experimenting with different flavours.  Japanese food is now everywhere.  Being vegetarian, the variety of sushi is limited in restaurants. 😦  Anyways, when you have a creative mind and hands that are willing to get dirty (dirty with food is always ok, not with mud. There’s a difference! I’m not an outdoor-hiking-kind fyi) then there’s no limit!

Having a love for aesthetics, the food I eat has to look as good as it tastes.  The taste is always takes precedence though, I will never compromise on taste.  Saying that, I would compromise on it just if it is very unhealthy and I’ve just come back from cardio. The cliche aphorism works well for me – health is wealth.

Ok, so you got the point.  The fact that the sushi looks impeccable and it is healthy makes it a winner.  Here’s a picture of the sushi I made:

Image

Please stare at it in awe as I did.  My husband thought it was very professional!  And I got tons of likes on Facebook and Instagram which boosted my ego.  Small things make me happy.  Happiness then leads to big things 🙂  So try being happy with small things in life, don’t just wait for the big things as they might not come and you’ll end up being a grumpy-old lady by then! I’ve met many, and boy are they unpleasant.

Back to Sushi –  just went slightly off tangent there.

B’s Quorn Teriyaki Steak Sushi Recipe

Makes: 3 rolls of Sushi (about 24 sushis – depending on the size) 

Ingredients:

  • 1 1/2 cups Japanese Rice
  • 6 Tbsp Sushi Rice Seasoning
  • Teriyaki Sauce
  • 1 Cucumber, cut in strips
  • Quorn Steak Strips (half the packet)
  • 3 Nori Sheets

Method:

  1. Cook rice in a rice cooker.  Japanese rice takes less water than normal rice, so be sure to check the instructions. The ratio of the rice I use is 1 cup rice to 1 1/3 cup water. Let the rice cool down, don’t refrigerate it.
  2. In the meantime, pour a bit of teriyaki sauce in a pan and cook steak strips.  Add water as needed, but make sure the end result is sticky steak and not watery.
  3. Add seasoning to the rice.  If you like it more on the sour side, add more.
  4. Oil Sushezi a bit before putting the rice inside, and follow instructions.  See the video- that’s what I did as this was my first attempt!
  5. Put cucumber on one side of your rice mixture, and the Quorn Strips on the other.
  6. Place glossy side of Nori downwards, and you’re ready to roll.
  7. Use water as a glue for the end of the Nori.  Refrigerate the roll for a while, then cut the sushi.  And put the cut pieces back in the fridge.  Sushi is best served cold with Japanese ginger and Wasabi.

Note:  Hands might get sticky with rice.  Keep bowl of water nearby and dip your hands in often to remove stickiness.To remove stickiness of knife when cutting sushi,  I like dipping knife in water after each cut.  Keeps the sushi clean and pretty!

Enjoy! Itadakimasu (いただきます)!  Have I mentioned I speak/read/write Japanese?  Ok so I do.  Not as well as before though, as I don’t have much practice anymore!

The phrase above translates to Bon Appetite 🙂