Review: Tastecard + Tastecard App

One of my favourite perks about living in London is the affordable prices of eating out.  Eating out often is often seen as a luxury in many countries.  In Japan, Australia and Singapore – all the countries I’ve lived prior to my move here had a common thread.  Eating out in restaurants were expensive.  A night out with friends in an average restaurant would cost about 30 SGD per head.  If we take this value as a dollar-to-dollar value not accounting for difference in currency value, it is astoundingly high!

Eating out in London with the tastecard is very reasonable.  You can walk out a meal paying just 8-10 pounds per head.  The tastecard gives you either a 50% discount or a 2 for 1 deal in thousands of restaurants across UK.  This even works in Dublin, Scotland, Wales.  I’ve used it in all those countries.  It makes travelling across UK more affordable as your daily budget factors less money to food.

Tastecard has an app which makes finding restaurants near your radius simple.  Often we try new restaurants based solely upon the fact that there is a 50% discount.  That proves to be an incentive to try an unknown restaurant.  We have discovered many hidden gems this way.  I’ll be reviewing must-eat restaurants in London that are part of the taste card group!

This is the home screen of the app:

Image

It allows for easy reference to history, recent search and allows you to search.  I’ve recently searched for afternoon teas – as you can see!  I love good afternoon teas!

If you click on the search tab below, the screen would look like this:

Image

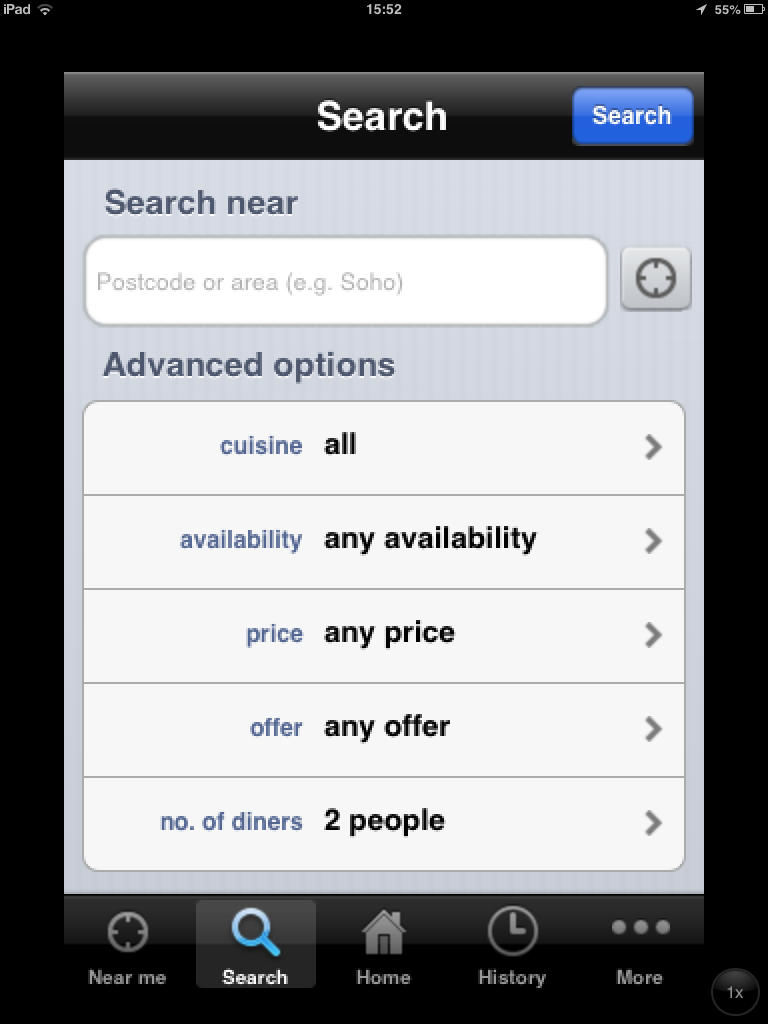
This allows users to make specific searches.  It helps me narrow down restaurants to the cuisine that I feel like eating 😉  (A girl needs what she needs!)

I strongly recommend this app to anyone who has tastecard.  And if you do not have tastecard and live in the UK – you should get an annual subscription now.  It’s usually 30 pounds (on offer).  One of the best inventions in UK!

B’s Birthday!

Had a fantastic day as it’s my BIRTHDAY!

I get terribly excited a few days prior to my birthday.  I do a mental countdown, which makes everyone feel I’m sort of mental.  I absolutely love my birthday ever since I was a child.  I let that exuberant child in me live forever and celebrate my day (which should be a public holiday!) hahahaha!

Image

A beautiful balloon my husband got for me 🙂

xx

B

B’s Eggless Oven Pancake Topped With Frozen Banana (ice-cream)

Me again 🙂  Today I thought I’ll blog again – another healthy recipe to keep the vegetarians going!  This oven pancake is eggless and puffs up in the oven – thus there’s no flipping required!  Easy treat with minimal ingredients.  Recently over my eggless home-made scones, a friend and I were having a conversation about eggless baking and she gave me a tip about substituting buttermilk for milk in the recipe and omitting eggs completely.  I had  to give it a go! 

I lined a pyrex dish with baking paper.  This allowed me to omit buttering the dish.  You can slightly butter the paper though.

ImageLooks kind of iffy, but it comes out easy don’t worry!  

The final result (I love this photo- it’s been edited using Snapseed):

ImageThis is a great low-fat treat.  There is NO SUGAR (except for the chocolate sprinkles on top which is minimal if you ask me). Also – the ice-cream is frozen banana which I blended.  That’s it!  Easy!  B’s food is usually quite easy! 

If you haven’t frozen banana before, here are the steps:

  • Peel the banana that is slightly browning
  • Cut it in small pieces
  • Freeze in ziplock
  • Can be frozen till 6 months (I’ve read online, but to be safer I’d say 3 months as I’m not a huge fan of freezing food to begin with)

B’s Eggless Oven Pancake Topped with Frozen Banana (ice-cream)

Bakes: One pancake for 2 people

Ingredients:

  • 1/2 cup all purpose flour
  • 1/2 cup milk + 1/2 tbsp vinegar (for the buttermilk)
  • 1/4 tsp salt
  • Vanilla essence to taste
  • A bit of butter to butter the tray (can omit this if using baking paper)
  • Frozen Banana
  • Chocolate Sprinkles (optional)

Method:

  1. Preheat oven to 210 C.
  2. Pour a bit less than 1/2 cup of milk in a measuring cup.  Add 1/2 tbsp of vinegar to it and let it sit for 5 minutes.  This becomes your buttermilk.
  3. Pout milk in a bowl and mix in the flour and salt with a whisk.  Add vanilla essence. 
  4. Don’t overmix as it will lose its fluffiness as a pancake. (Just FYI)
  5. Pour in a pyrex dish lined with baking paper.
  6. Bake for about 30 minutes till it’s golden.
  7. Blend the banana pieces with a tiny bit of milk. 
  8. Top the pancake with the ice-cream and serve!

Enjoy a healthy dessert to beat the summer in London!

xx

B


B’s Easy Vegetarian Chow Mein (Chinese Noodles)

Hello everyone.  Hope everyones been very good 🙂 Here’s another one of B’s Recipes 🙂  I am really enjoying this platform for me to blog and share.  Comments and likes are really encouraging, so please do keep them coming! 🙂

Thought I’d share an easy Chinese recipe that I’ve made up quite a while ago.  We have this usually about once a month with variation of veggies (depending what’s in my pantry!)

Hubby’s Chow Mein (it just looked more colourful than mine.  I DO NOT EAT CHILLI. I am Japanese at heart. Mild food = good food):

ImageDoesn’t that just look great?

Here’s a pic of all the veggies while cooking:

Image

And a pic of my noodles, slightly less colourful in comparison but more delectable:

Image

B’s Easy Vegetarian Chow Mein (Chinese Noodles)

Makes: Enough for 3-4 people depending on appetite! haha!

Ingredients:

  • 1 packet Chow Mein Noodles
  • 4 carrots
  • 6 mushrooms
  • Handful of green beans
  • 3 Quorn Sausages
  • Seasoning: Light Soya Sauce, Dark Soya Sauce, 1/2 tsp red chilli powder, Sesame oil, mushroom seasoning

Method:

  1. Prepare noodles and drain.
  2. Put sausages in oven as instructions show and chop in bite size pieces.
  3. In a wok, put 1 tsp normal oil and 1 tbsp sesame oil.  When hot stir fry cut mushrooms till done.  Add grated carrots and cut green beans.  Add sausage pieces. Add seasoning to taste.
  4. Add noodles and adjust flavour.

It’s easy, healthy, vegetarian and yummy.  You really need to try this!

xx

B

Photo-editing app: Snapseed

Snapseed – an app that I use for all my iphone photo editing.  I simply love it.  It gives richer texture and color to my food pictures too.  FYI – the food pictures that you see on my blog are all taken with an iPhone 5.  Some are edited with Snapseed, ok most are edited. hahaha!

Reasons I like Snapseed:

  • Easy to use
  • FREE (free is always good!)
  • Distinct difference after editing
  • Can be saved/emailed easily from the app

You can see the difference for yourself, here’s a picture of coconut scones with chocolate before editing:

Image


Here’s one after editing:

Image

The difference is pretty obvious.  The colors look more vibrant!!


Verdict:

TO DOWNLOAD OR NOT TO DOWNLOAD:  TO DOWNLOAD

Hope you enjoy editing your pictures!

xx

B


B’s Easy Guacamole (Avocado Spread) Recipe

HOLY MOLY – GUACAMOLE!

I’m trying to go back to my healthy eating regime.  It’s really a challenge with all the visitors that keep coming to London. No guest would like a bowl of salad for a meal or a healthy spread.  But since everyone’s gone for now – I can eat healthy again.

I made a guacamole spread as I had 2 avocados in the fridge and didn’t feel like eating them raw in salad. It’s really very easy for those of you who haven’t made it before!  I leave out onion and garlic just for the added simplicity.  However, you can fancy it up all you want!

Many people mash the avocado up but I prefer it to be a smoother paste.

I blended my ingredients to form a paste:

ImageThe creamy spread after I seasoned it:

Image

It was lovely!  Tasty and healthy vegetarian food, you can’t go wrong!

B’s Easy Guacamole (Avocado Spread)

Ingredients:

  • 2 avocados (ripened)
  • 4-5 cherry tomatoes
  • 1-2 tbsp lemon juice
  • 1/2 tsp cumin powder
  • Salt and Black Pepper to season

Method:

  • Mash avocado.  Put it into a blender/chopper with cherry tomatoes cut into halves.  Blend till its a creamy paste.
  • Remove into a bowl and season with lemon juice, cumin powder, salt and pepper!

So easy, so tasty, so… there’s just no excuse 🙂

xx

B

B’s Makhani Potato Bake

Hello all!  I’ve been so MIA lately – have been having guest and been so busy,  I made this for my so-so-lovely visitors.  They really enjoyed it 🙂  I made this as I could make the sauce before hand which would give me less stress!! It became sort of an indian butter masala and pasta bake fusion.  Vegetarians sometimes have limited fancy food.  Cheese and potatoes are always a winner.  I would definitely make this again! But I would have to hit the gym several times before that and after that!

Here’s the sauce:

Image

And this is how it looks like fresh out of the oven:Image

Another look at it, to simply tempt you… Yes I love making people hungry!Image

B’s Makhani Potato Bake

Ingredients:

  • Makhani Sauce
  • Baby Potatoes (I bought ready-made herb and butter)
  • Shredded 4 Cheese 
  • Some Tabasco/Dunriver Sauce

Method:

  • Prepare Baby Potatoes
  • Pour yummy sauce over it.  Top up with cheese and tabasco.
  • Bake at 200 degrees and serve while hot.

Enjoy it!  I would suggest it as a leftover whenever you try out my Makhani Paneer 🙂

xx


OPI: Turquoise Bright Nails

The sun is blazing in the midst of London’s summer.  Yes summer.  It’s been so hot the last few days that I feel I’m living in the tropics.  Funny how I complain about the weather either way.  Haha!

The bright weather made me get bright nails done today!

Image

It’s the OPI Turquoise Shatter.  I’m not into shatter-look nails anymore, but since I have the color, I thought why not! 😉

Simply love the brightness of it.

Here’s another shot:

Image

Trying to add spark to my mundane monday which consists of just way too much laundry (entire weekend), chores and grocery shopping to stock the fridge for the upcoming week.

xx

B

Coconut Scones

Hello everyone 🙂 I’ve been experimenting with Scones lately.  I altered the BBC recipe a bit to make coconut scones.  I had to make these twice as I was unsure of the amount of coconut to put in it.  The first go,  I used 50g of coconut.  The second go, I increased it a bit to suit my palette more!

Image

I tried different shapes, just for fun!

B’s Coconut Scones

Bakes: About 12 small scones, but I made some big funky shapes instead.

Ingredients:

  • 225g Self Raising Flour
  • 55g Butter
  • 50g Caster Sugar
  • 75g Fine Desiccated Coconut
  • Pinch of Salt
  • 150ml milk

Method:

  1. Preheat oven to 220C.
  2. Mix together the flour, salt and rub the butter. Make sure the butter is cold.  This ensures softer scones.
  3. Add in the coconut and sugar.  Mix in the milk and knead lightly to a dough.
  4. Move to a floured surface and cut the shapes required.
  5. Brush with milk.
  6. Bake for about 13 minutes, till golden on the top.
  7. Serve with butter.  🙂

I personally like this the best with just butter as you can then appreciate the taste of the coconut.  I raised the amount of sugar in this recipe as a result.  As served with butter, it should be a bit sweeter than a normal scone that is served with jam.

YES, the FOODIE thought about it properly!  Give it a go. You know you want to!

xx

B

Easy & Vegan: Scrambled Tofu

Prior to being Vegetarian, one of my favourite combinations was scrambled egg with rice.  Growing up I used to have it like fried rice, more like butter-glistening rice with egg.  It was my go-to comfort food 🙂

I’ve now found a replacement to suit my new vegetarian lifestyle.  It’s been 10 years.  It’s definitely a commitment that I hope would be life-long.  So anyways!  I made tofu scramble for lunch yesterday, didn’t want it to have butter/oil or any fat.  So here’s a low fat, protein filled easy recipe.

But hold on – first have a sneak peak...

Image

It was yummy!  Packed with flavour and grilled asparagus on the side. 🙂

All you need is:

Image

B’s Tofu Scramble

Makes: Enough for 1 (or 2 if you are eating with something else on the side)

Ingredients:

  • 1 packet Firm Silken Tofu (refer to the picture)
  • Seasoning: Turmeric, Red Chilli Powder, Soya Sauce, Salt, Pepper

Method:

  1. Put the block of tofu in the pan.  Keep mashing it.  All the excessive water to evaporated.
  2. It usually takes around 5-7 minutes on high flame.
  3. Keep mashing.  When it is dry and resembles egg, start seasoning.
  4. Start off with some Turmeric (about 1/2 tsp) to give it an egg color.
  5. Add chilli powder, soya sauce, salt and pepper to taste.

Note: I like a lot of flavour, as a result I add a lot of seasoning.  Always remember that tofu, unlike egg is rather bland.  Season away!

Enjoy it with brown rice and a side or even on top of savoury waffles with sausages. (I have had that before too, and it was really good!) 🙂

Enjoy! 

xx

B